|
|
|
|
|
|
CARBON FIBER REAR STRESS BAR INSTALLATION GUIDE PART #A1801 MK4 GTI, GOLF,JETTA Thank you for purchasing our product. Please follow the installation procedure when installing the specified product. The Alpha 1 CF rear STB is design to enhance handling of your performance car without sacrificing trunk space. You will have improved steering response, more rigid chassis and less body roll during hard cornering. Alpha 1 Motorsports is not responsible for any misuse of tools, improper drilled holes and workmanship, and bodily injuries when performing the installation of the specified product. Proceed at you own risk or seek professional help locally!
PACKING LIST Carbon fiber rear stress bar consists of the following hardware: TOOLS REQUIRED 2. Center punch 3. Pilot drill bit, 1/8" 4. Diameter 17/64" drill bit 5. Allen hex key 6. Open-end wrench 7. Hydraulic jack and jack stands
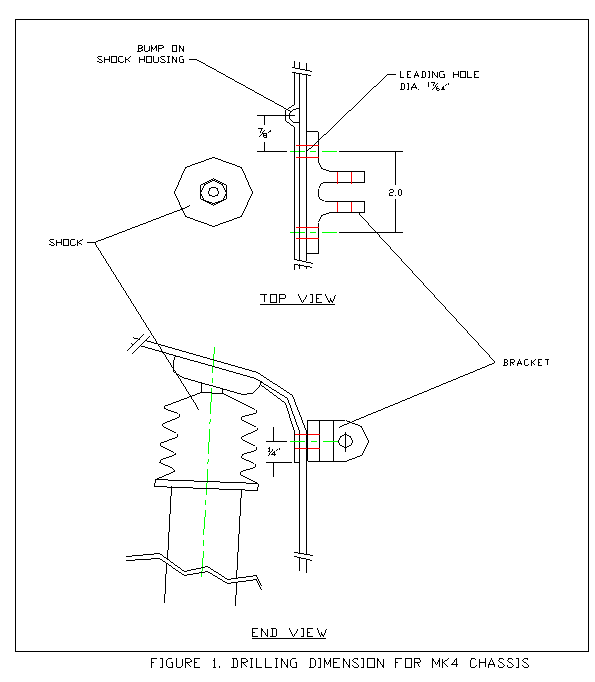
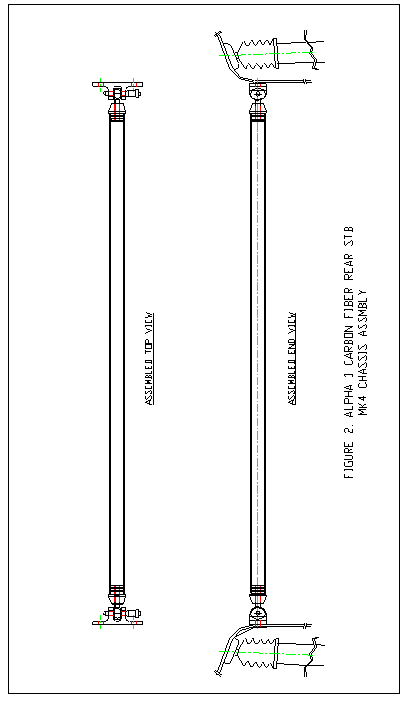
INSTALLATION PROCEDURE OPTION 1 (without shock removal) STEP 1- Jack the rear end up and remove both rear wheels STEP 2- Locate rear shock housing assembly; look for the lap joint weld seam to the wheel well. See Figure 1. STEP 3- Locate a bump on the housing approximately ½" rise from the wheel well, measure 7/8" from the center of bump and ¼" for the bottom edge of shock housing, mark and center punch location STEP 4- Use 1/8" pilot drill and drill through into the trunk STEP 5- Use diameter 17/64" bit and drill through into the trunk STEP 6- Obtain aluminum bracket and one fastener and install snug (be sure it is the leading hole of the bracket) STEP 7- Measure bottom edge of the bracket from the trunk floor, it should be 9.5", measure the other and make sure it is level to the trunk floor STEP 8- Use bracket as template; drill through with 17/64" bit STEP 9- Remove fastener and bracket, spray primer on drilled holes to protect from corrosion STEP 10- Install bracket with the 2 fasteners, washers and Ny-lock nuts. Tighten with Allen key and wrench. STEP 11- Repeat Step 2 – Step 10 for the other side STEP 12- Adjust rod end and use 5/16" quick release pins to install the Carbon fiber rear STB in position. See Figure 2. Option 1 is the quicker installation method and does not need the hassle of removing more components than you need. This method is recommended for people feel less comfortable with removing shocks and other items. Total installation time should be less than 1 hour. OPTION 2 (shock removal) STEP 1- Jack the rear end up, remove both rear wheels, remove shock by loosen 2 hex bolts. Let the shock assembly drop and make sure you have room to work STEP 2- Locate rear shock housing assembly; look for the lap joint weld seam to the wheel well. See Figure 1. STEP 3- Locate a bump on the housing approximately ½" rise from the wheel well, measure 7/8" from the center and ¼" for the bottom edge of shock housing, mark and center punch location STEP 4- Measure 2" inline with the first punch mark, mark and center punch location STEP 5- Use 1/8" pilot drill and drill the 2 marked location through into the trunk STEP 6- Use diameter 17/64" bit and drill 2 holes through into the trunk STEP 7- Spray primer on drilled holes to protect from corrosion STEP 8- Obtain aluminum bracket and fasteners and install snugly
PRE-LOADING ADJUSTMENT STEP 1- With CF rear STB installed, rotate CF bar (make sure the rod ends are extending towards the wheel well) STEP 2- Rotate until snug (DO NOT OVER TIGHTEN) use wrench and lock jam nuts in place to save settings
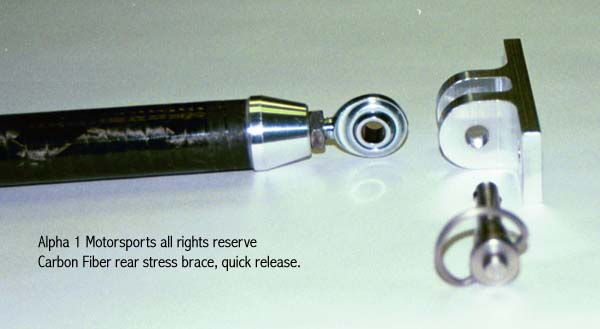
MAINTENANCE Use damped cloth to clean the CF rear STB. You can also use wax-less polish or metal polish and polish for the desire shine. Beware of the 2 rod-ends, the threads are different. One is right hand thread and one is left hand thread. Do not get them mix up. Threading the wrong hole will damage your CF rear STB. Grease bearing as needed if they appear to be dry. TECH-SUPPORT If you need help with installation or questions, you can e-mail your questions to techsup@alpha1motorsports.com. You can also visit our web site at www.alpha1motorpsorts.com and look for the installation guide. It contains many helpful pictures to guide you through.
|