|
|
|
|
|
|
I finished my intake just in time for the FL GTG. Tonight I figured out how to post pics on the forum. So here is the project. Author: Dmitri Chilkine
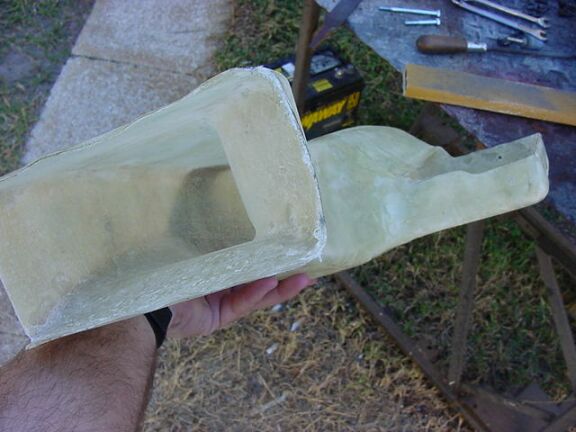
Materials: Cost: Less than 60 dollars How To: First I screwed around with some cardboard and a ruler figuring out dimensions of the new intake. Note that the shifter balance thing moves up about 3/4 inch when in 5th gear. After I thought I was totally finished, I had to readjust everything because I couldn’t get my car in 5th gear. Put it in 5th gear and then do the measuring. Once I had the dimensions I started to cut foam blocks and glueing them together. I would run back and forth checking to see if the foam mold was fitting in the engine bay.
I had to make the mold in several pieces because of its size and odd shape. First I made the part that would mount to the airbox. Then I made the part that would connect to the grill area. And finally I made the part that connected the two. Once the pieces were made, I started sanding. I used a sanding block and belt sander. This went very quickly. Then I adjusted it to fit in the engine bay by trimming hear and there.
Once that was done, I started to fiberglass it. I cut fiberglass cloth strips about 2 inch wide and 2 feet long. I mixed the resin and coated a section of the mold, fiberglassed it, and moved on until it is covered. Fiberglassing takes some technique, read up on it before attempting this project. I put 2-3 layers of fiberglass. Allowing it to dry 24 hours and sanding rough spots between each coat. I had to patch several areas due to bubbles in the fiberglass that were discovered after sanding out the rough areas. I then poured acetone down the intake. The foam melted away. All that was left was the fiberglass intake and Elmers glue pieces. The inside was kinda rough in some areas where the resin seeped into voids of the styrofoam. I attached a strip of heavy sandpaper to the end of a long metal rod with a slit at the end. This was attached to a drill and used like a whip to ream the inside out. It worked really well. After that I sanded the inside by hand.
I then trimmed the edges where the intake attaches to the grill and airbox
with a Dremmel tool. I cut out the bottom of my airbox to fit perfectly into the
intake. I first pop riveted them together and then fiberglassed them to ensure
air tightness.
I plugged off the hole that the OEM snorkel enters the airbox at with some plastic and superglue. I had to raise the airbox by about 2 & ½ inches. To do this I had to find longer bolts to hold the airbox in with. I put an aluminum sleeve over the bolt to raise it to the height needed. Once that was done It could be all put back together. Performance Results: Awesome! The biggest contributor of power without a doubt (pre-upsolute). Comments: This mod isn’t for everyone. It was a lot harder than I thought it would be. Total time to do is hard to say. I worked on the styrofoam mold for about 4-5 hours total. Then fiberglassing and sanding it took about a total of 3-4 hours. Trimming it up and mounting the airbox to the intake took about 3-4 hours. Adjusting the whole thing in the engine bay took about 2 hours total. I worked on this project for short periods for about 3 weeks. If you like to work on projects and have access to tools, this one is great for you. I really enjoyed doing this project. My Dad helped and gave me advice so it went a little smoother than if I had done it alone. ------------------ |